Direkt zum Inhalt

FAQ & News

Häufig gestellte Fragen

  • Das auf Drupal basierende Content-Management-System (CMS) ist ein einfaches, aber leistungsfähiges Werkzeug zur Erstellung bildoptimierter Websites. Sie können Ihr Seitendesign mit einer vorgefertigten Vorlage beginnen. Dieses HowTo erläutert die Möglichkeiten, die picturemaxx Drupal für Ihre kreative Arbeit bietet.

    Weitere Informationen finden Sie unter Erste Schritte.

  • You can add as many pages to your website as you wish. You can link pages by using the Navigation Menu of your website.

    There are different content types to define your pages. The most common content type is Basic Page. It is built by single sections displaying various paragraphs, e.g. a plain Section for text and images, an image Collection, a Slideor Columns, Text & Media to display thumbnails and text.

    Additionally, the picturemaxx CMS offers you other custom content types, like News Articles, Events, Publications, and Teams. 

    To learn more, go to Basic Page.

  • Navigate to Main Administrative Menu of the picturemaxx CMS and select People. The People page lists all existing users for the admin to edit or review them.

    To create a new user:

    1. Click Add user.
    2. Enter a valid email address and create a username and password.
      • Set up an individual username and password for each user.

    To learn more, go to Set up users.

  • The Navigation Menu always appears on the top and centered on the page. As a special feature, you can create a dropdown menu. To edit the Navigation Menu, go to Structure → Menus → Main navigation. To create a new menu item, click + Add link.

    To learn more, refer to Header and Footer Options.

    Add user


  • In Main Administrative Menu, navigate to Configuration → picturemaxx configuration → Theme settings → Colors, Logos & Styles. 

    To add a logo, scroll down to Logo image. We recommend uploading a png file cropped to the exact size you want it to appear on your pages. Before uploading, delete the path information in the Path to custom logo field, to remove the existing file from your template.

    To add a favicon, scroll down to Favicon. We recommend uploading a png file, square, max. size 48x48 px. Before uploading, delete the path information in the Path to custom icon field, to remove the existing file from your template.


  • To create an image gallery on your website, add the Collection paragraph type to a page. Configure Display Options to customize your image collection. Also, there are three layout options to choose from.

    To learn more, refer to Collections.

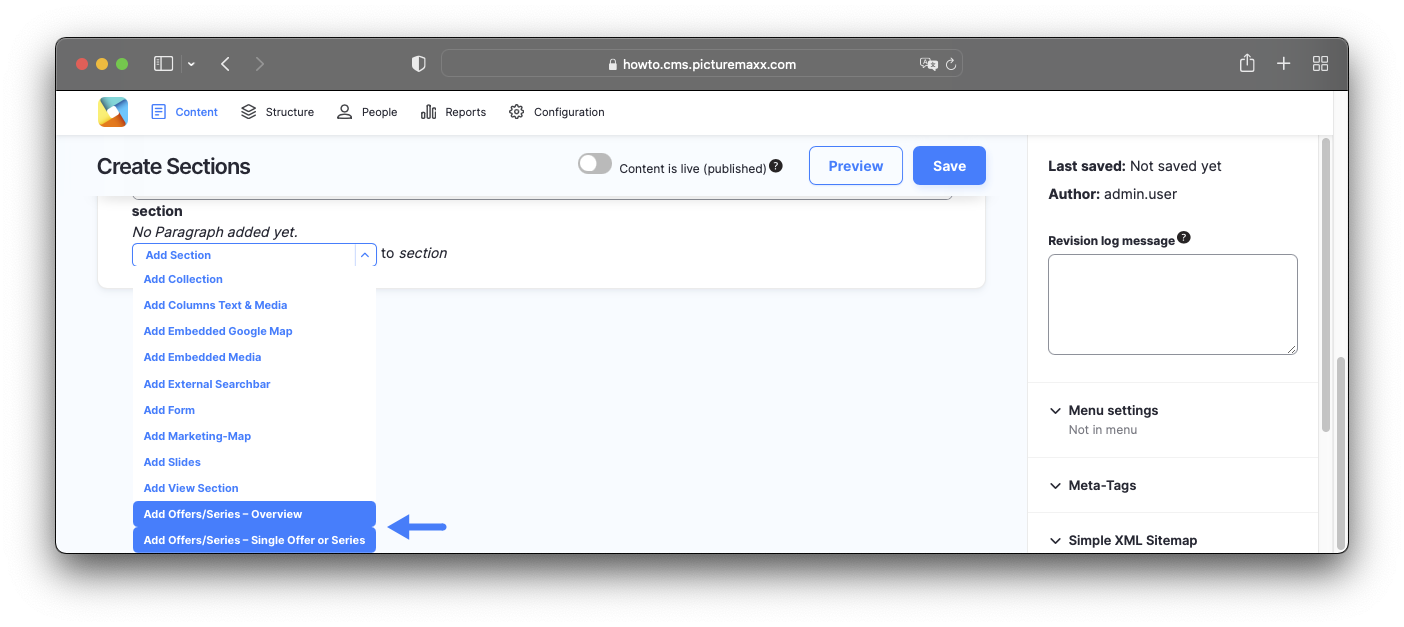
  • You can create image galleries and overviews of existing offers and series set up in your media management in picturemaxx Backstage. To establish a connection to picturemaxx Backstage and display featured visuals on your website: select Add Offers/Series - Overview from the Add Section dropdown. 

    To learn more, refer to Offers & Series.

    add offer series


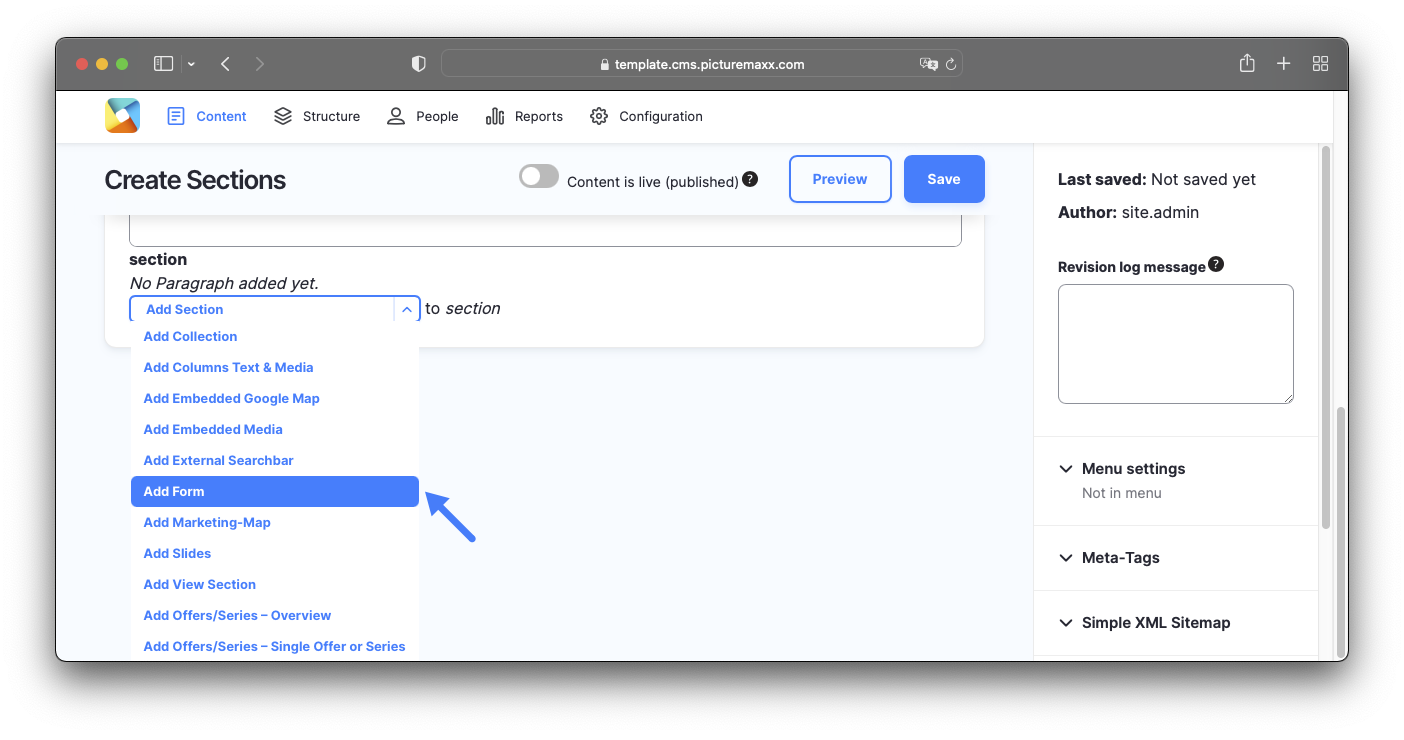
  • Add the Form paragraph type to your page as shown below: Add section → Add form.

    To learn more, refer to Contact Form.

    Add form


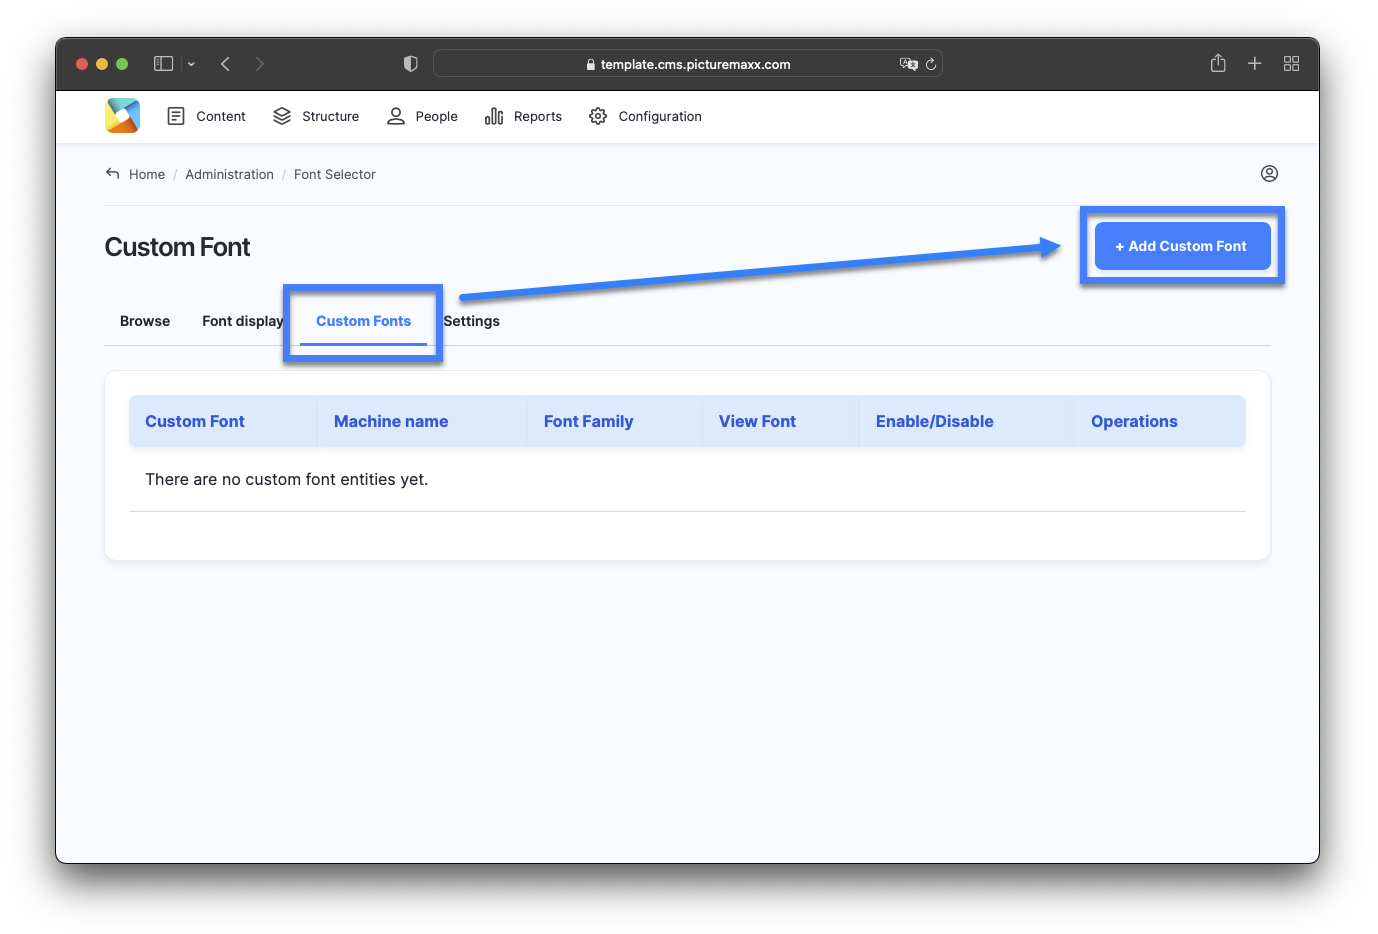
  • To use your own font styles, navigate to Configuration → picturemaxx → Font selection and configuration. You can choose required font attributes and upload them.

    To upload your fonts, select the Custom Fonts tab and click Add Custom Font.

    To learn more, refer to Change Look & Feel.

    Add font


  • You can add parallax scrolling to any page of your site. The effect is based on scrolling the background and foreground layers at different speeds, creating a vibrant 3D scene. This works best on a page with multiple elements.

    1. Add a paragraph type where you'd like to apply Parallax Effect. The following paragraph types can be used: 
      Section, Google Maps, Form, View Section.
    2. Choose an image from your media library or upload a new one. If you're using a text box, select a background color. 
    3. Enable Use Parallax Effect in Display Options.

    To learn more, refer to Parallax Effect.

  • We initially set up the standard languages, English and/or German, according to your preferences. Contact picturemaxx Professional Service, if you need to setup another language.

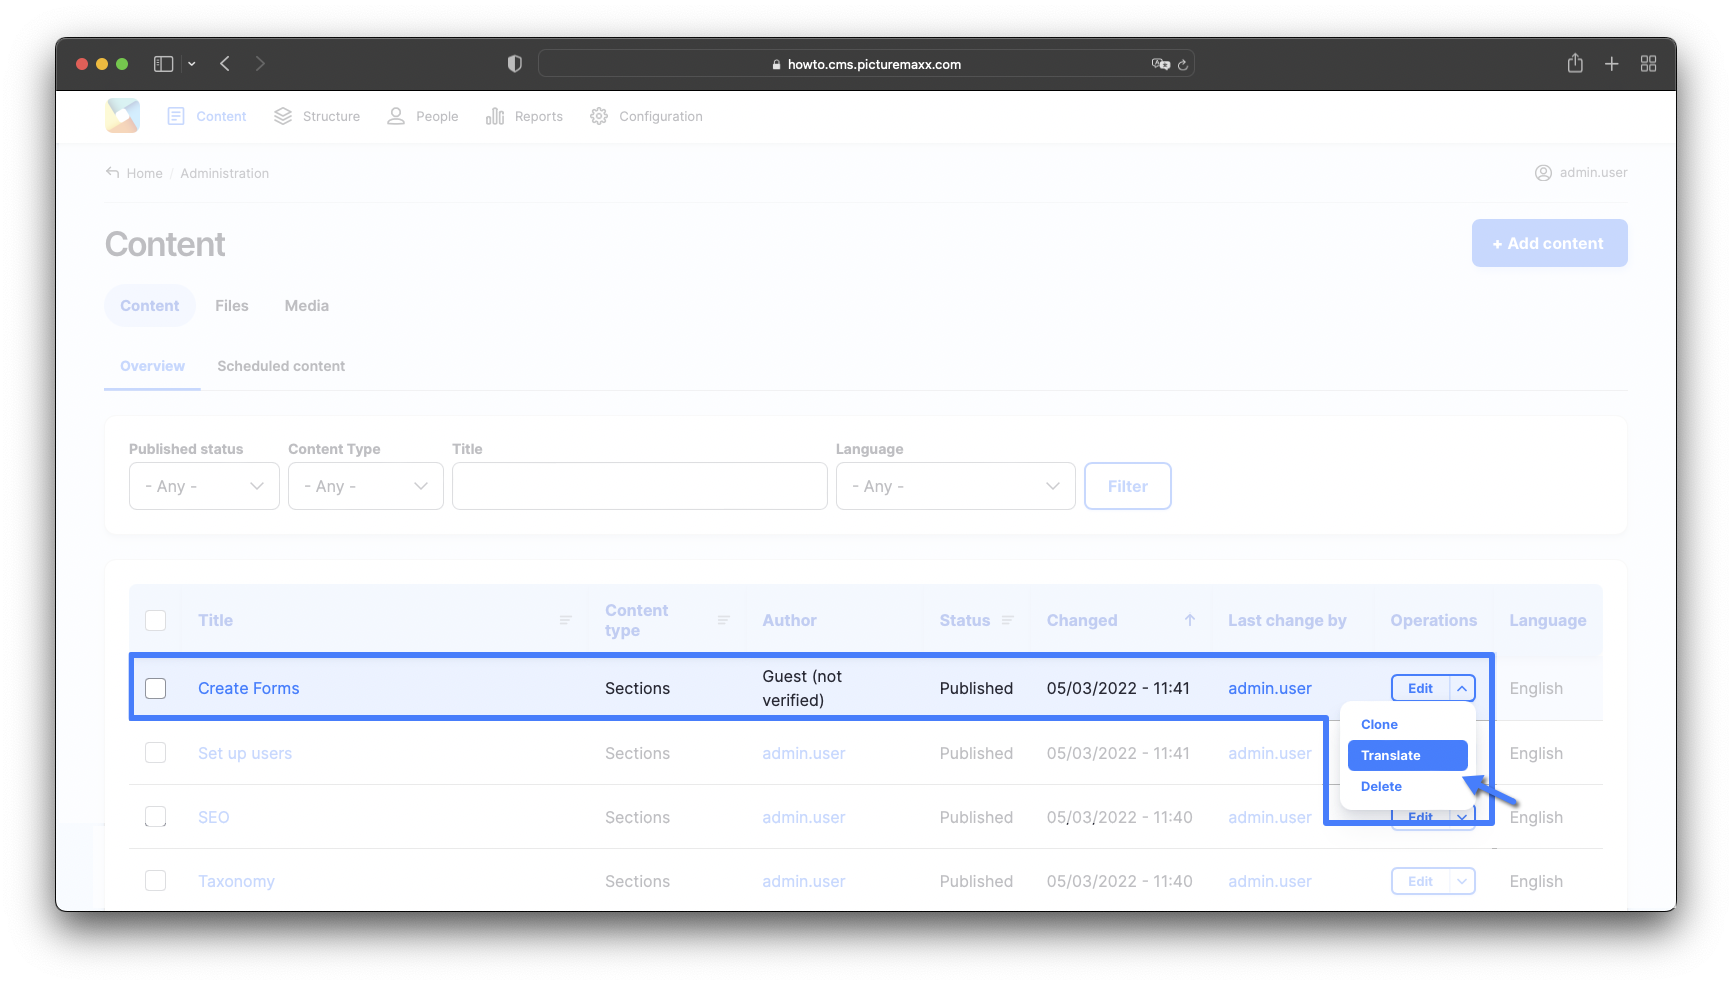
    If you've decided to make your website multilingual and there is a second language set, enable the Translate option to create a linked copy of the original page. Add text in the secondary language to the translated page. The translated copy of a page is listed in Main Administrative Menu → Content. So, if you translate and save a Home page, it will appear in the list twice - as the original and the translated page. 

    NOTE: The option does not translate page content for you, only the user interface.

    Translate


  • Almost no website can do without a Cookie Banner anymore. picturemaxx Drupal offers two possibilities to work with: Consent Manager and Usercentrics.

    Learn where to set up the Cookie Banner.

  • Google Analytics

    To use Google Analytics, you need to obtain a Web Property ID. To do so, register your site with Google Analytics, or if you already have registered your website, go to your Google Analytics Settings page to find the ID next to each site profile. For more information refer to Analytics Help.

    In Main Administrative Menu, navigate to Configuration → System → Google Analytics


    Matomo Web Analytics

    Let us know if you choose to work with Matomo Web Analytics, an analytics tool that offers 100% data ownership and keeps your business GDPR and CCPA compliant. We can add a Matomo key to your website.


    Learn more at SEO & Meta-Tags.

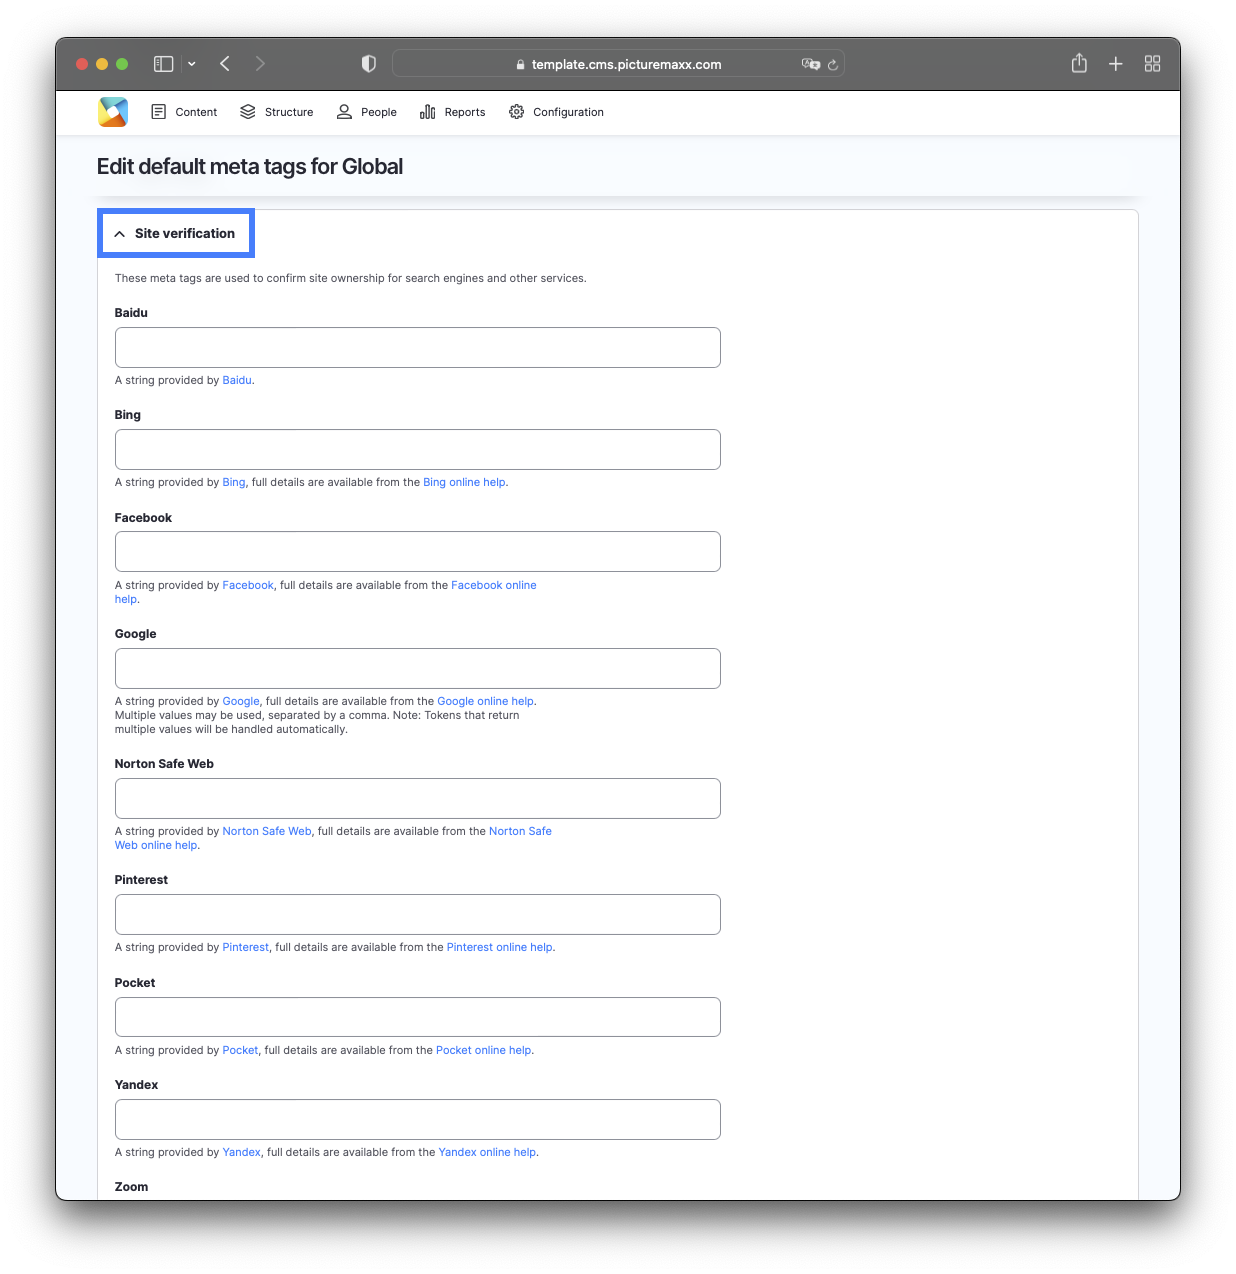
  • These meta tags are used to confirm site ownership for search engines and other services. Look up the guidelines to confirm your ownership for each search engine or other service individually. The support sites are linked below each tag line.

    NOTE: Site verification is important, for example, if you want to add your site to Google Analytics. Without the ownership verification it is not possible. 

    Quick Guide to confirm ownership

    To use Google Analytics, confirm your ownership for all pages of your website.

    • In Main Administrative Menu, navigate to Configuration → Search and metadata → Metatag.
    • To access the Global settings, click Edit next to it.
    • Scroll down to Site verification.
    • Fill in the boxes with the strings provided by a corresponding webservice to confirm ownership for all pages of your website. 
    • Remember to save the changes at the bottom of the page.
    Site verification


  • In Main Administrative Menu, navigate to Content → Media to upload, delete, publish, unpublish or clone media content items.

    Refer to Upload Media to learn more.

  • Shariff is a privacy-compliant open-source program. Unlike usual share buttons, it does not track visitors directly if they share your website's content. The Shariff button only establishes direct contact between social networks if the page visitor actively clicks the share button.

    To edit Shariff settings, in Main Administrative Menu, go to Configuration  Web services → Shariff sharing buttons.


    Note: Shariff sharing buttons work for content types News Article and Publication only. To share other pieces of content on social media, add Shariff sharing buttons within the Block Layout, to display the buttons on every page.

    Learn more at SEO & Meta-Tags.

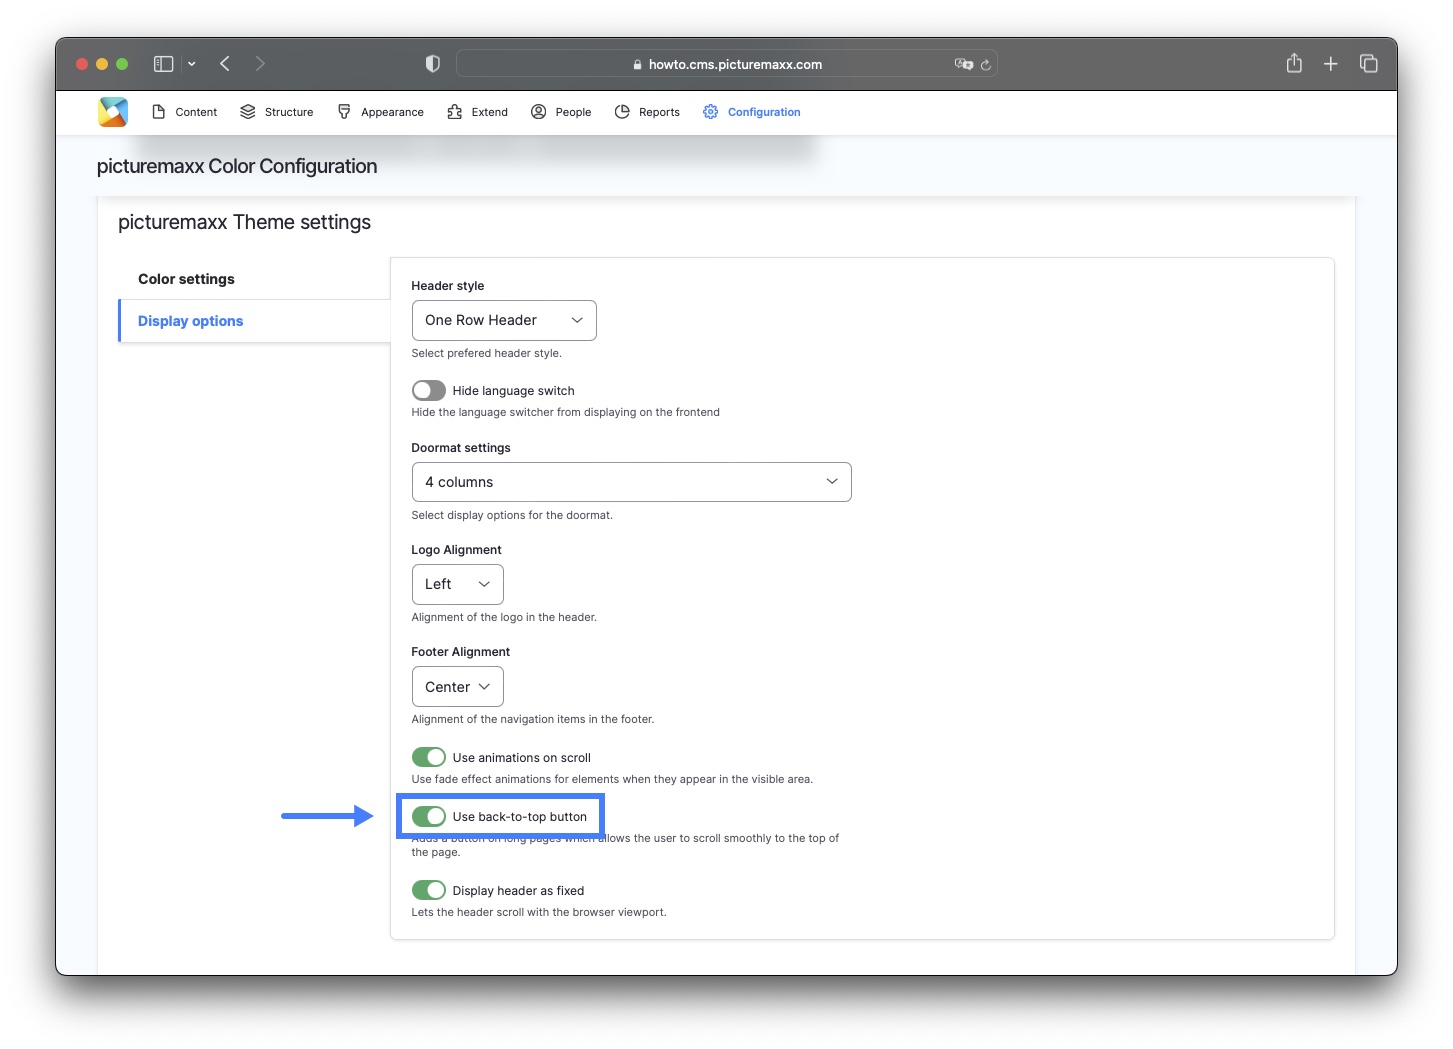
  • In Main Administrative Menu, navigate to Configuration → picturemaxx → Colors, Logos & Styles. Scroll down to picturemaxx Theme Settings and select Use back-to-top button ​​​​​(as shown below). The user can now easily get back to the top of a long page. 

    For more information, have a look at Change look & feel

    back to top